Connect Allen-Bradley PLCs to Vuforia Spatial Toolbox with Kepware
Hardware Needed:
- An Allen Bradley PLC (This tutorial was written and tested with two Allen-Bradley PLCs, a Micro850 and a CompactLogix5480.)
- An Ethernet Cable
- Windows Computer (This tutorial and testing utilized an Intel NUC)
Set up the PLC
Micro850
Install Connected Components Workbench (CCW), following these instructions from 2:39-8min to configure the PLC with CCW.
CompactLogix5480
For the CompactLogix5480, install Rockwell Automation Studio 5000 Logix Designer. We used these lessons to connect to and configure our CompactLogix5480.
Test with a simple program
Once your device is connected anad you can create a program, make a simple “Hello World” that will activate some of outputs on the PLC. A possible demo could be to use the Timer (TON) within CCW to turn your outputs on and off repeatedly. Here’s an example:
- This video shows the process of using the TON with CCW.
- This PDF shows the ladder logic for a traffic light demo made in Studio 5000 Logix Designer.
Set up Networking
This project used the ethernet (wired) port to create a local network to communicate to the PLC, and leveraged the wireless network for outbound/internet communications.
- For the wireless connection, a static or dynammic IP will work.
- For the wired connection, we gave the computer a static ethernet IP Address: 192.168.0.1; Subnet Mask: 255.255.255.0; Default Gateway and Primary DNS were set to match the gateway and DNS for the wireless connection.
Set the Micro850 IP address
Click on the Micro850 tab in CCW and select Ethernet on the bottom right. Once selected, scroll down on the right side and select “Configure IP address and settings” underneath Internet Protocol (IP) Settings.
- Adjust the IP to your settings. For us, we set the IP Address to 192.168.0.2, the Subnet Mask to 255.255.255.0, and the Gateway Address to 192.168.0.1
Set the CompactLogix5480 IP address
For the CompactLogix5480, we used RSLinx to set the Ethernet IP Address to 192.168.0.2, the Subnet Mask to 255.255.255.0, and the Gateway Address to 192.168.0.1 per the instructions in the CompactLogix5480 user manual.
**To verify that the PLC should is connected to your Windows Computer, ping the IP address from the command prompt on the computer with ping 192.168.0.2, if the response is some number of ms, they are connected.
Connect the PLC to Kepware
- Download and install KEPServerEX – this is a free trial, but is fully functional; KEPServerEX will run for 2 hours at a time, then it needs to be restarted. Note, this product is also called “ThingWorx Indsutrical Connectivity”.
- Download and install Java
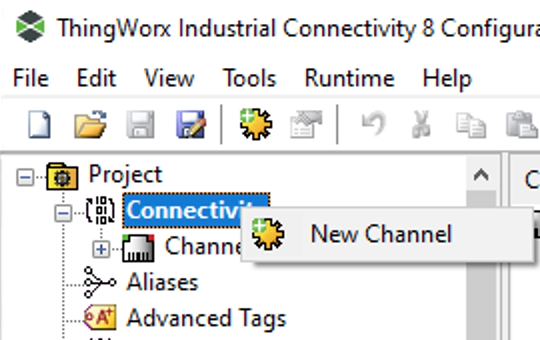
Open Kepware, right-click “Connectivity” and add a new Channel:
Micro850 and CCW
This video walks through the next few steps of the different settings to alter (watch until 9:50min).
- IMPORTANT: Notice at minute 5:35 how the video says to have the same address for the tag (variable) as in CCW. This address may look something like
_IO_EM_DO_01. If the tag addresses for all your variables do not match the ones in CCW, the connection with Kepware will not work.
To test the connection between your PLC and Kepware:
- First, on CCW, connect you PLC and begin to run your “Hello World” program. This can be done by clicking “Disconnect” at the top. If your “Hello World” program does not run in a loop, just click “Disconnect” so that it says “Connected” but do not run the program yet.
- Next, on Kepware click the “Quick Client” button:
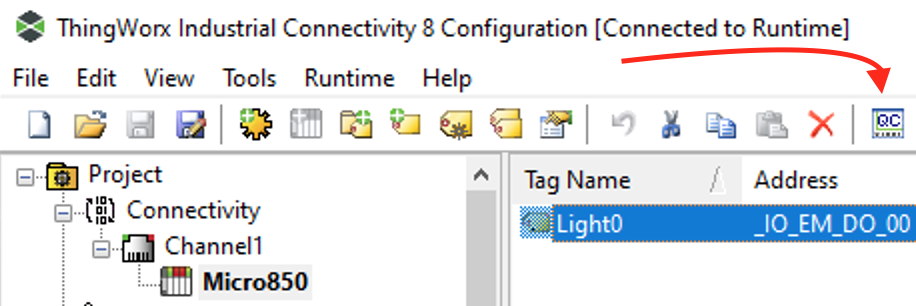
- Once this is clicked, it should open a new window. Select Chanel1.”name of your PLC”, The quality should be labeled as “Good” and once your program on CCW runs (or if it is already running) you should see the value update.

CompactLogix5480 and Studio 5000
This Kepware guide walks through the same steps for Studio 5000.
Connecting Kepware to Vuforia Spatial Toolbox
Download the Spatial Toolbox
Download and install the spatial toolbox through the PTC Reality Team’s Website
- After installation, start the toolbox edge server
Connect Kepware and Spatial Toolbox
The Spatial Toolbox uses OPCUA to communicate with Kepware. Once the server is running, follow the steps below to set up Kepware and Spatial Toolbox to work together.
Configure OPC UA in Kepware
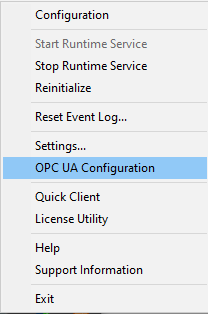
- To Add an OPC server in the Kepware configuration, open OPC UA Configuration from the Kepware config tray icon:
- Choose the correct adapter (probably wifi, and set a port, or use default. This IP and port will be used in the in the VST edge server Kepware addon configuration.
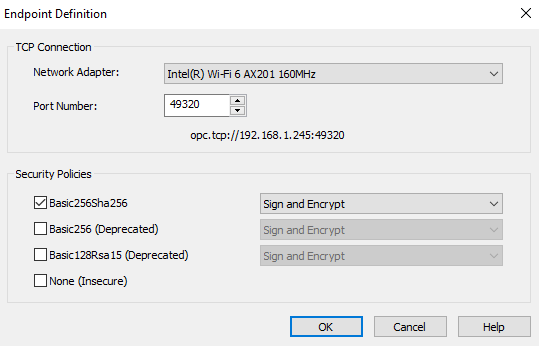
-
Close window with OK
-
Create an OPCUA user; open Settings from the Kepware config tray icon:
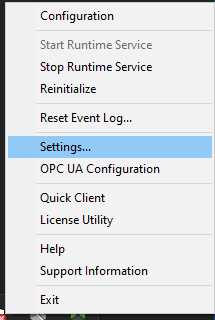
- Create an Admin User with the Kepware (ThingWorx Industrial Connectivity) Settings Control Panel:
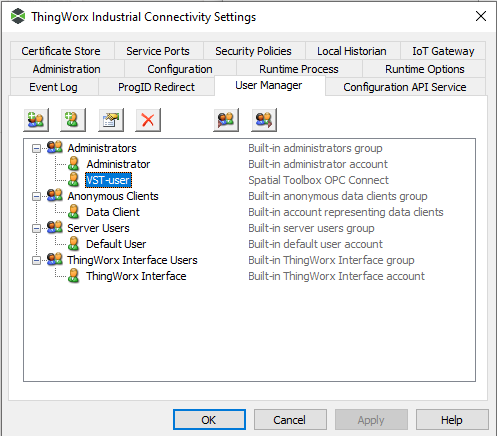
- Save and close
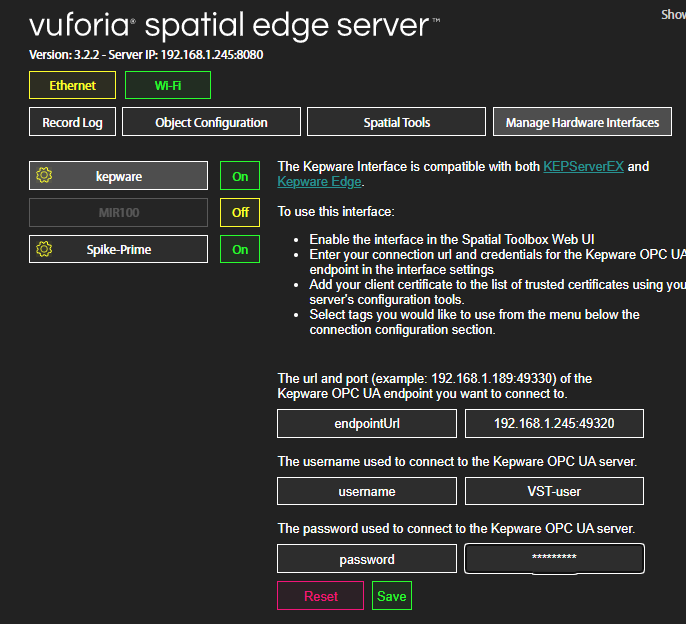
Configure Vuforia Spatial Toolbox Server settings
- Open a browser and navigate to ‘localhost:8080’
- Click on Manage Hardware Interfaces and click the Settings icon next to Kepware
- Enter the IP:Port, username and password in the VST edge server Kepware addon configuration:
Restart VST Edge server
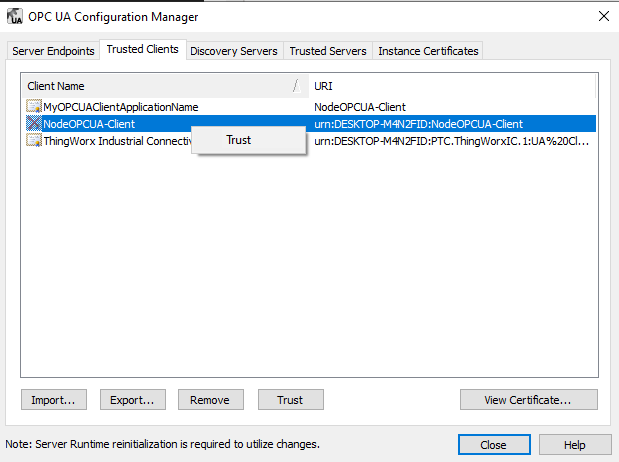
- In the terminal where you started it, click 'CTRL-C' to stop it, and then enter 'node server' to start it again - Re-open the OPC UA Configuration from the Kepware config tray icon to Trust the rejected certificate:
- Click Close and restart VST Edge Server again, and refresh the server web page
Reinitialize Kepware
- In Kepware, click on the “Runtime” menu (next to “Help”) and select reinitialize.
- You should see feedback in the Kepware interface that
Look for Tags in VST Edge server
- Click on Manage Hardware Interfaces and click the Settings icon next to Kepware
- If the connection is working, you should see any tags/varibles you created in your PLC
- Check the tags you want to use; now, if you return to Object Configureation and add a target to the kepware…. object, you will have nodes available for each of the tags.
Have fun!
To start playing with the toolbox, please see this Youtube Playlist to add image targets and how to use the Spatial Toolbox!